Arduino Bluetooth Example
Prepared by Dr. Aaron Scher
[email protected]
Oregon Institute of Technology
Back to Aaron's home page.
This example shows how to achieve two-way communication between a laptop running Windows 8 and an Arduino via Bluetooth.
The Arduino is connected to a Bluetooth module, an LED, and a DHT22 sensor.
The Arduino is used to monitor temperature and humidity via the DHT22
sensor, and this data is displayed on the laptop.
A user will also be able to remotely turn on and off the LED from the laptop.
Note 1: This example draws heavily from Adafruits's Bluetooth Temperature and Humidity Sensor Tutorial.
In case this link doesn't work, you can download the tutorial by clicking: here.
A very thorough introduction to the Bluefruit EZ-link can also be downloaded by clicking: here.
Note 2: I use a laptop for this example running Windows 8.
Note 3: It is assumed that your laptop has Bluetooth capability.
Material list
- Arduino Uno. Other Arduino models should also work for this example.
- Bluefruit EZ-Link - Bluetooth Serial Link & Arduino Programmer.
- DHT-22 temperature/humidity sesor. I happend to purchase mine from Adafruit . You also need a 10 kOhm resistor for the DHT-22 sensor. With my purchase, the sensor included this resistor.
- Basic 5mm LED (e.g. something like this would work) and 220 Ohm resistor.
- A simple, standard, solderless breadboard and some wire to make connections.
Step 1: Bluetooth Pairing
It's now time to "introduce" your Bluetooh moduled to your laptop.
It is assumed that your laptop and your Bluetooth module are not paired. If you have already paired the two devices, then you can skip this step (Step 1).
Hardware setup
You do not need the Arduino for this part. You only need the Bluetooth module and laptop. Make sure your laptop has Bluetooth turned on.
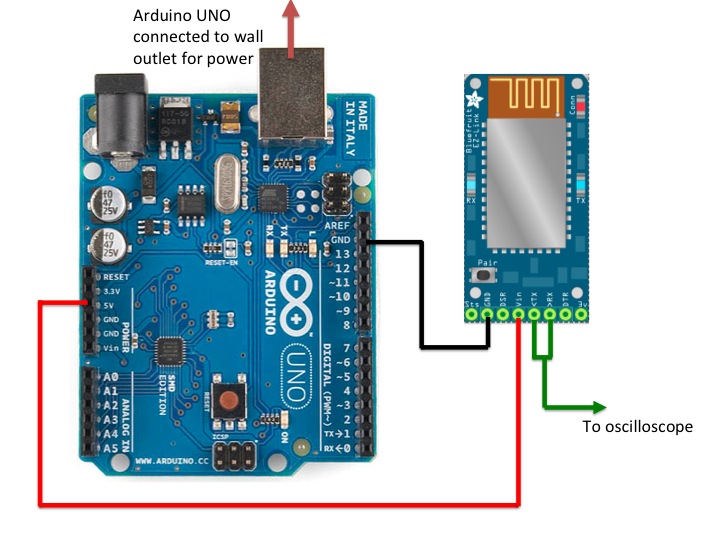
Turn on your Bluetooth module by applying 5V to the Vin pin of the Bluefruit EZ-link and ground to the GND pin.
Once power is applied to the Bluetooth module, it will flash its indicator light, indicating that the device is "discoverable". This means other
Bluetooth devices can detect, pair, or connect to it.
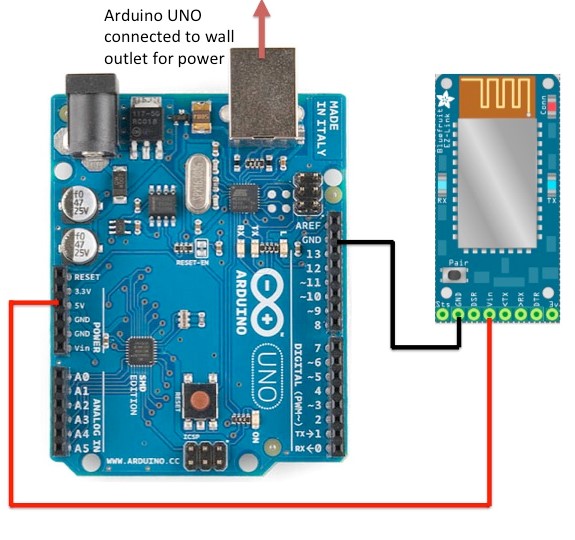
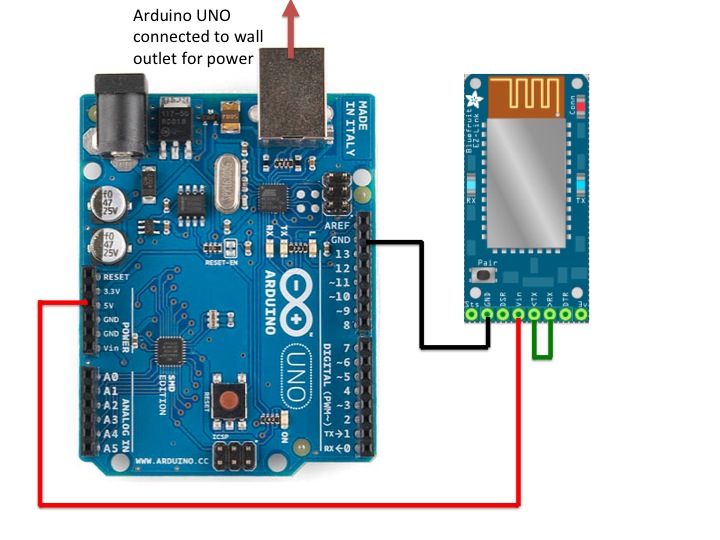
For convenience, I am using my Arduino Uno's 5V and ground pin to supply the power to the Bluefruit module as shown in the diagram below.
However, again, you do not need the Arduino at this step. You could power the Bluetooth module from an external power supply.
In my case I am using my Arduino's 5V and GND pins to power the Bluefruit EZ-link as illustrated below.
Pairing
The Bluefruit EZ-link should be powered and slowly flashing a red LED. Now, you need to command Windows 8 to "show bluetooth devices".
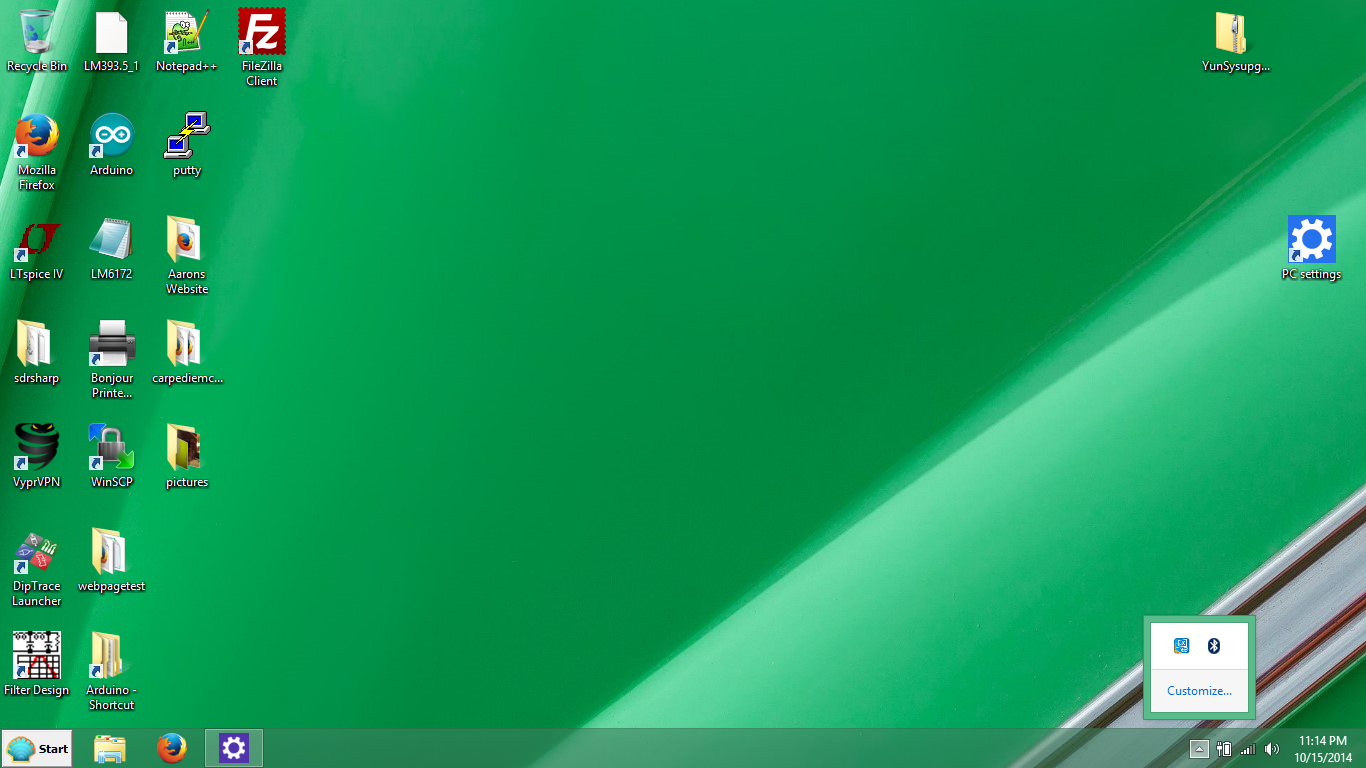
On my laptop, that means first clicking on the little arrow on the lower right of the bar at the bottom of the desktop as seen in the screenshot below:
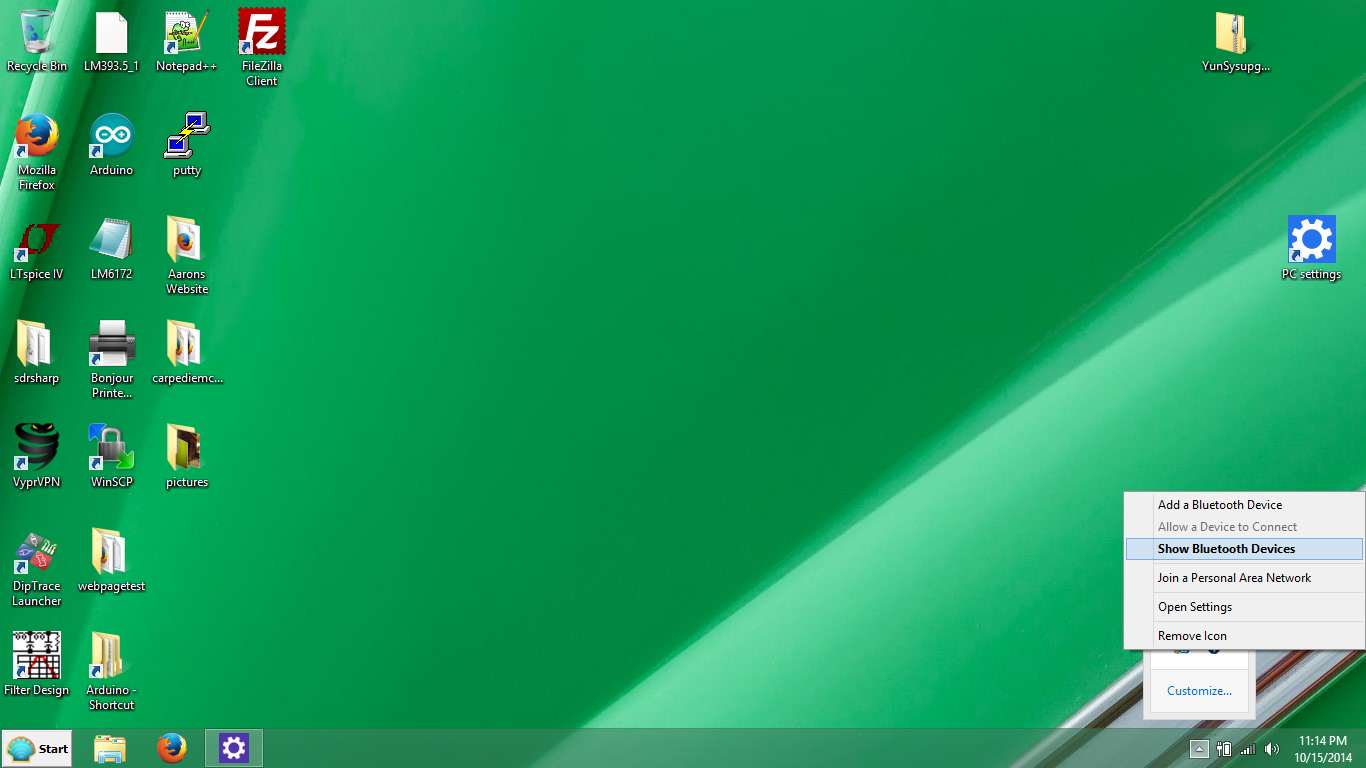
Now I right click on the little bluetooth logo and select "Show Bluetooth Devices" as seen in the screenshot below.
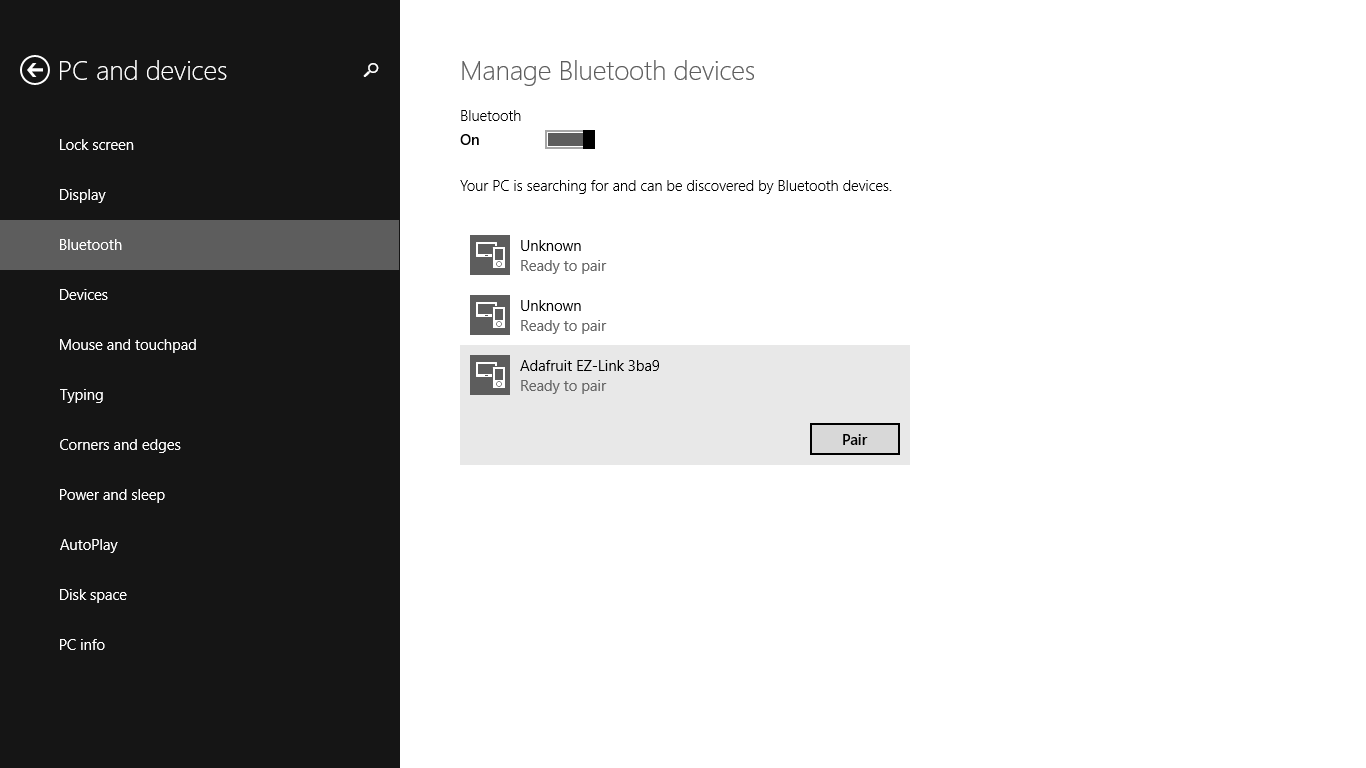
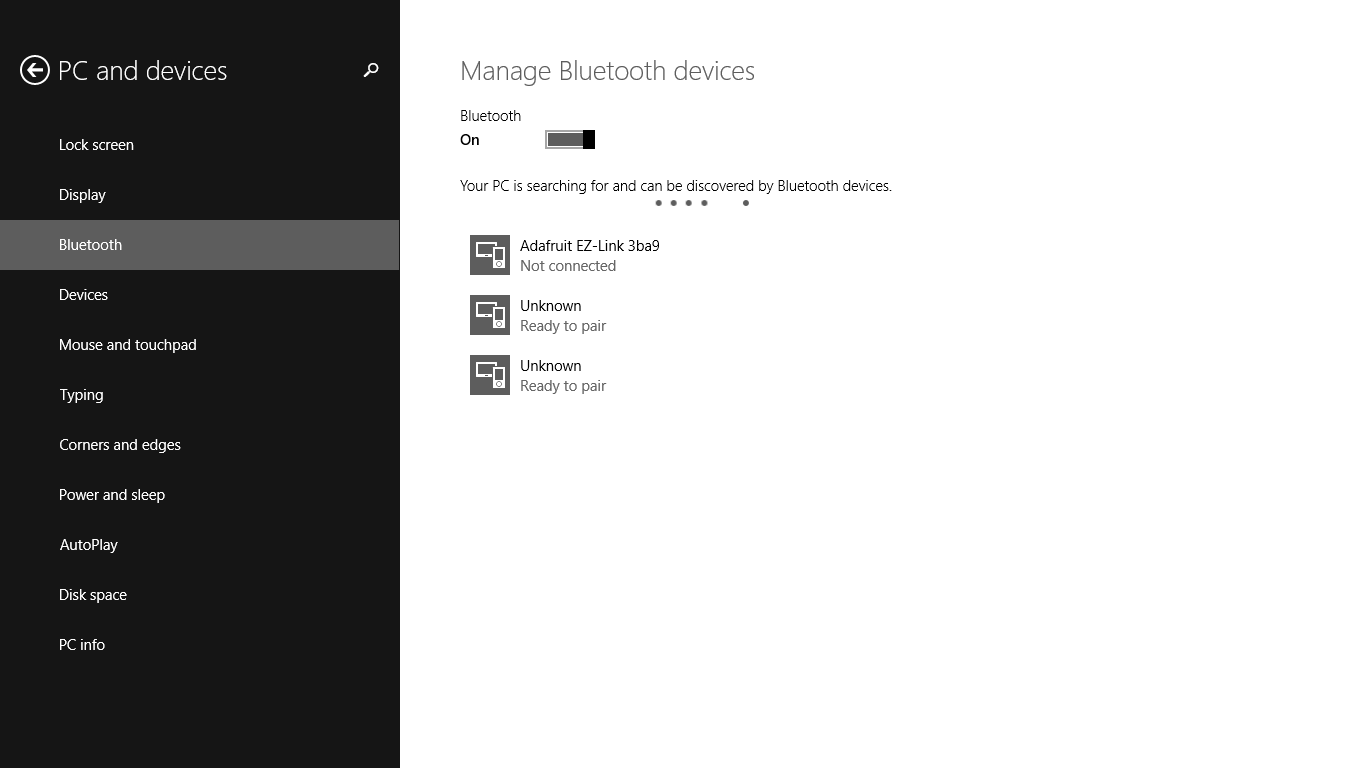
This takes me to the new snazzy screen shown below. First make sure Bluetooth is on. Now wait a moment, and "magically" without doing anything,
I see the Adafruit EZ-link device appear in the device list with the comforting message "Ready to pair". If you don't see the device
appear, try rebooting the Bluefruit EZ-link (by momentarily disconnecting and reconnecting it from the power supply). You can also try pressing the tiny reset button
on the device.
Anyways, once the device is shown in the list, the next obvious thing to do is click on the button labeled "Pair".
After you press "pair", the Bluefruit EZ-link device flashes red very fast, and you can tell (via a little status bar) that the laptop
is communicating and loading data from
the Bluetooth device. At this point, I find it very important to wait for this pairing process to finish. When I say wait, I mean it. This means don't
click on anything or minimize the screen. Just wait for the process to be done. If you don't, the pairing might not work correctly
(even though it might seem like the pairing is successful, you might not be able to connect later if you mess around with this step).
I've read online that if you are asked for a pairing code, the code is 1234, but I have not been asked for this code.
You will know the pairing is complete when the Bluefruit EZ-link flashes again (as it did when it was first powered up) and the icon for the Adafruit EZ link says
"Not connected". At first I was a bit alarmed that the device shows "Not connected", but this is totally normal. All you did thus far is pair the device.
In fact, if you disconnect the Bluefruit EZ-link from the power all together, the icon for the Adafruit EZ-link will remain,
i.e. the laptop remembers
that is has paired with the Bluefruit EZ-link even when the Bluefruit EZ-link is not in range or turned on.
We will connect to the Bluefruit EZ-link when sending serial data back and forth between the and the laptop. The laptop does not
automatically maintain a connection to the bluetooth device in the background; this is in contrast to how the laptop does
maintain a connection to a router via WiFi even when you're not surfing the net.
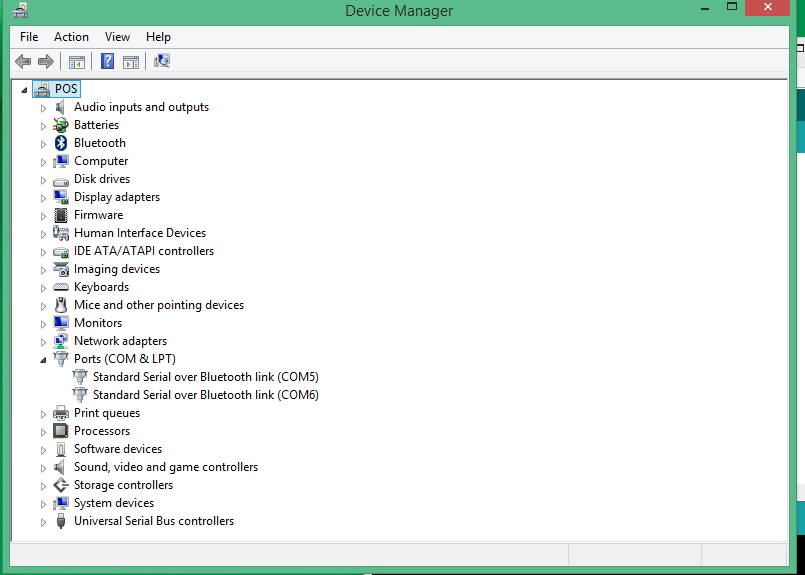
If the pairing is successful, you should see that Windows has created two COM ports in the Device Manager (accessed via the control panel), as shown
in the screenshot below.
I am not sure exactly why, but Windows creates two COM ports. However, you will only be communicating with the Bluefruit EZ-link
via one of these COM ports.
To see which COM port you will use to communicate with the Bluefruit EZ-link, go to
"Devices and Printers" section in the Control Panel, as shown below.
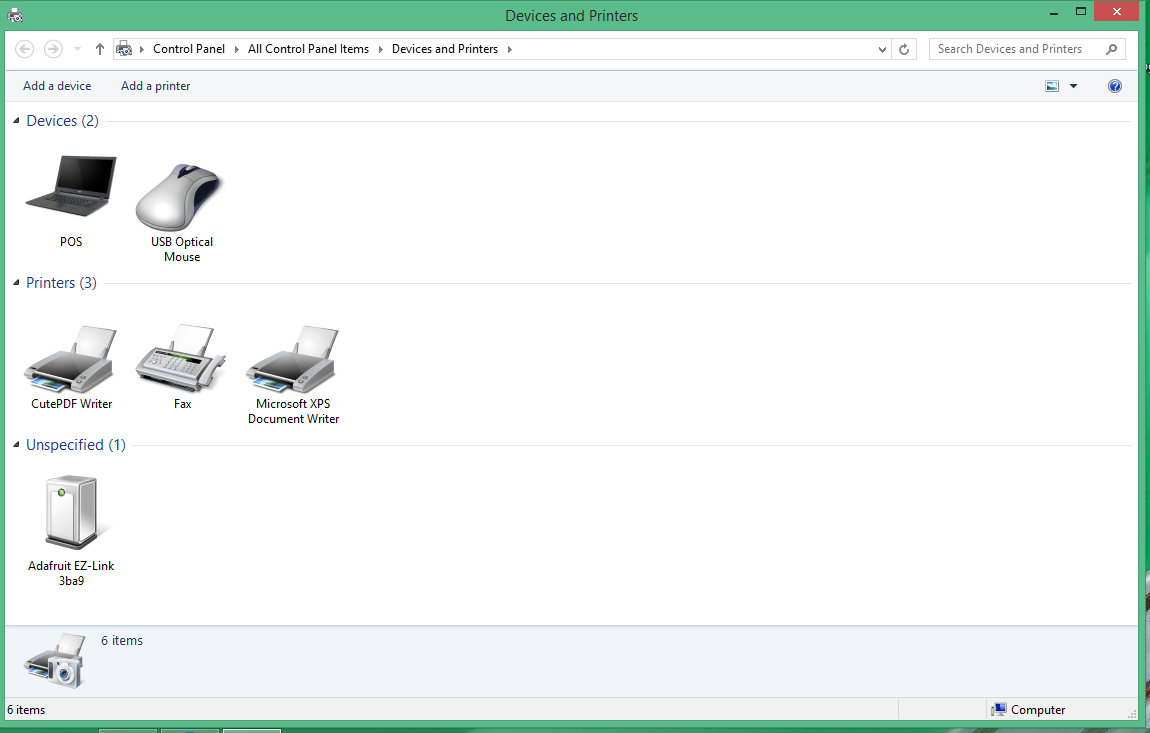
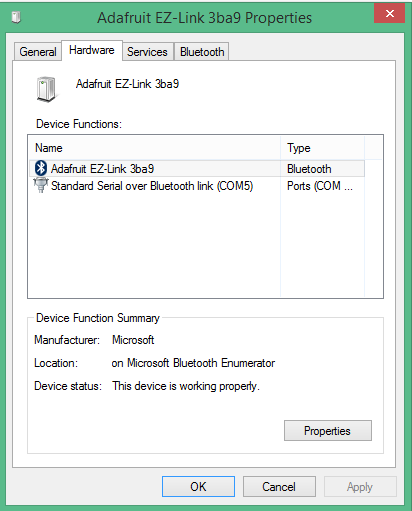
Now, right click on the Adafruit EZ-link icon and select "Properties". Select the hardware tab.
Here we find out what particular COM port we will actually be communicating with the Bluefruit EZ-link.
As the screenshot below indicates, for my particular case, I will be using COM port 5 to
communicate with the Bluefruit EZ-link.
Step 2: Test it out
Echo test
To confirm that the Bluefruit EZ-link is working properly and the connection between the laptop and Bluefruit EZ-link is good, we
are going to perform a simple echo test. Connect the TX pin directly to the RX pin of the Bluefruit EZ-link as shown below.
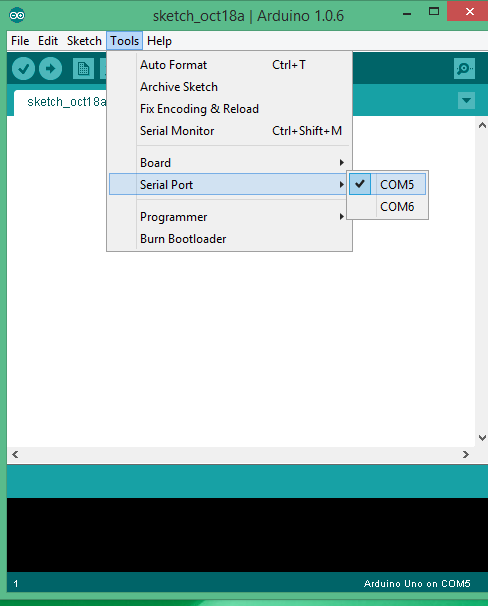
Now open up the Arduino integrated design environment (IDE). In the "Tools" menu, select the correct COM port determined in the previous step,
as shown in the screenshot below
(for my particular case, I use COM 5).
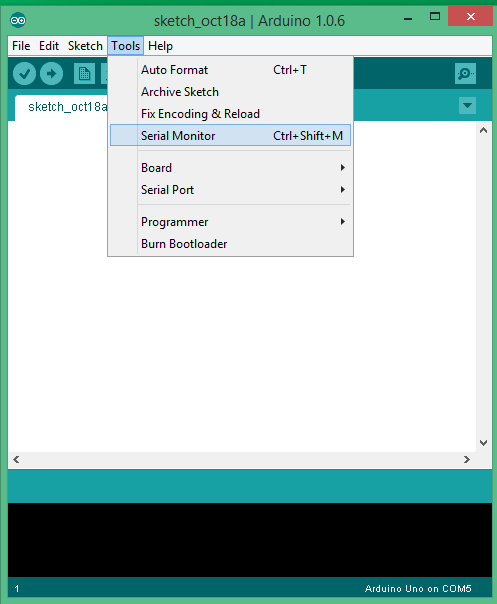
Now open the serial monitor, as demonstrated below.
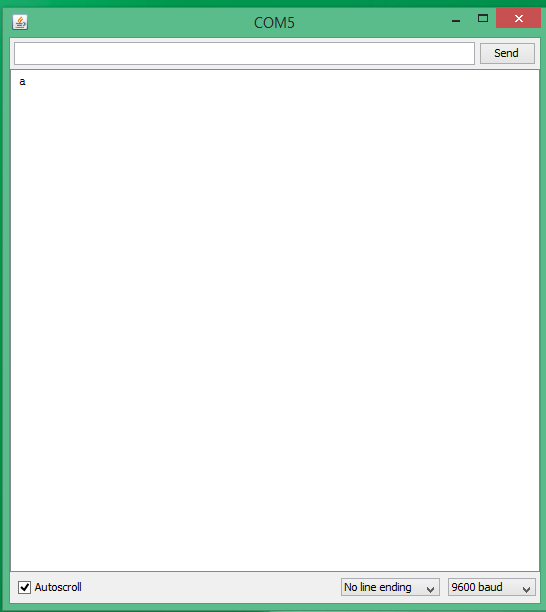
Notice that once you open the serial monitor, the Bluefruit EZ-link will rapidly flash red. This means
the laptop is connected to the Bluefruit EZ-link.
Now type a character like "a" in the serial monitor and press "Send". Almost immediately, the character will be echoed back. This means wireless communication between
your laptop and the Bluefruit EZ-link is working! So what is going on?
Once you type a letter in the serial monitor and press "Send", the character (i.e. serial data) is sent to the
Bluetooth COM port (COM 5 in my case). The data is then converted to an RF signal and sent wirelessly via the bluetooth module in your laptop,
which is then
recieved by the Bluefruit EZ-link. The Bluefruit EZ-link automatically sends any serial data it receieves
to its TX pin. This data is fed directly into the RX pin of the Bluefruit EZ-link (since we directly connected to TX and RX pins).
Whatever data appears on the RX pin
of the Bluefruit EZ-Link is automatically sent wirelessly back to the laptop. The laptop recieves the data and displays it on the serial monitor.
There is nothing special about using the Arduino IDE serial monitor to exchange serial data with the Bluefruit EZ-link.
You can use other software. As an example, let's communicate using PuTTY, which is a popular
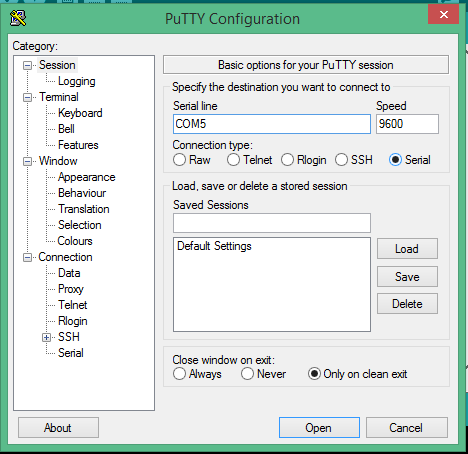
SSH and SFTP client for Windows. To use PuTTY, open up the program and in the "Session" menu (which should
open up automatically), change the settings to Serial and select the correct COM port, as demonstrated in the screenshot below.
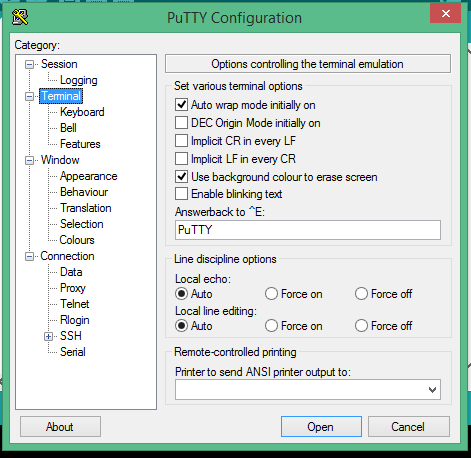
FYI: If you want to change the "local echo" settings of PuTTY, click on the "Terminal" menu, as demonstrated in the screenshot below.
I'm going to keep the local echo at "Auto" - but this is a personal decision that effects what I see on the terminal window, it has nothing to do with Bluetooth.
With local echo disabled, characters you type in the PuTTY window are not
echoed in the window by PuTTY. They are simply sent to the COM port. People choose to turn on local echo, because it is difficult
to edit a line locally without being able to see it. In our test, characters we type into the terminal window will be echoed back,
but not locally. Characters are wirelessly sent to the EZ-link Bluefruit which then automatically retransmits the characters
back to the laptop for display.
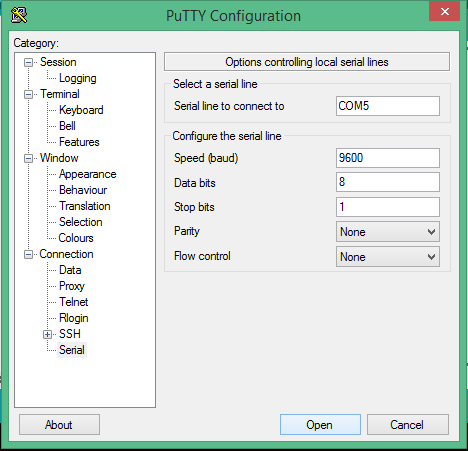
Now slect the "Serial" menu, make sure the correct COM port is set, and configure the serial line as demonstrated in the screenshot below.
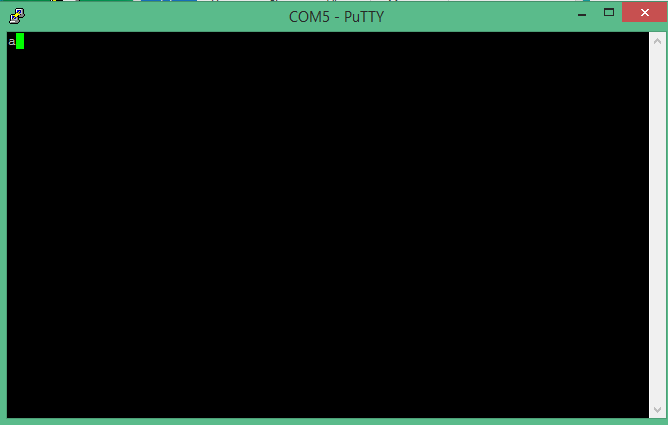
Press "Open" and the serial terminal should load. You will see the Bluefruit EZ-Link flashing quickly.
Press a letter and,
almost immediately, the character will be echoed back. This is not a "local echo" in the sense that the program is
automatically generating the echo. PuTTY is displaying whatever serial data is present on the COM5 port (i.e. data recieved back from the Bluefruit EZ-link.)
Just for fun serial capture
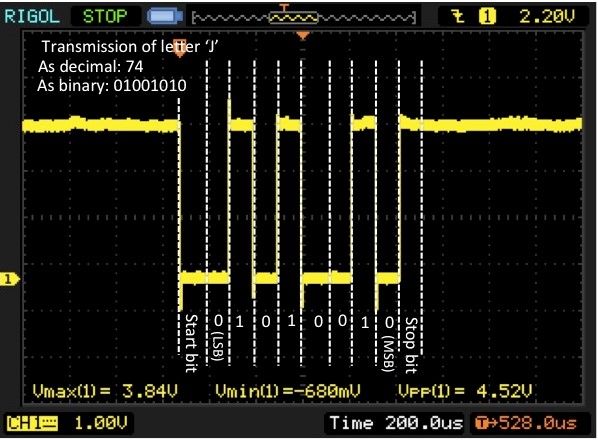
Just for fun, I connected my oscilliscope to the TX pin of the Bluefruit EZ-link and captured some serial data (i.e. measured the voltage at this pin with respect to ground after sending data to the Bluefruit EZ-Link).
A schematic diagram of my setup is shown below.
I am using a Rigol DS1052E to view the data. To setup the Rigol to make a signal capture of the serial data, I do the following:
- Press the button labeled "Auto" on the Rigol to clear everything.
- Press the Acquire button (which is is the group of buttons labeled "menu") on the Rigol. Set "MemDepth" to "Long Mem".
- Set the vertical (amplitude) scale to 1V by turning the verical scale knob on the Rigol.
The value of the vertical scale is listed in the very bottom left of the screen.
- For 9600 baud rate communication, set the horizontal (time) scale to 200us by turning the horizontal scale knob on the Rigol.
The value of the horizontal scale is listed near the bottom right of the screen.
- Adjunst the trigger level so that it is a volt or so lower than the noisy signal displayed on the scope.
- Press the button labeled "MENU" under the trigger knob on the Rigol. Change the "Sweep" parameter to "Single".
Here is the result of sending a capital letter J to the oscilliscope via the Arduino's serial monitor.
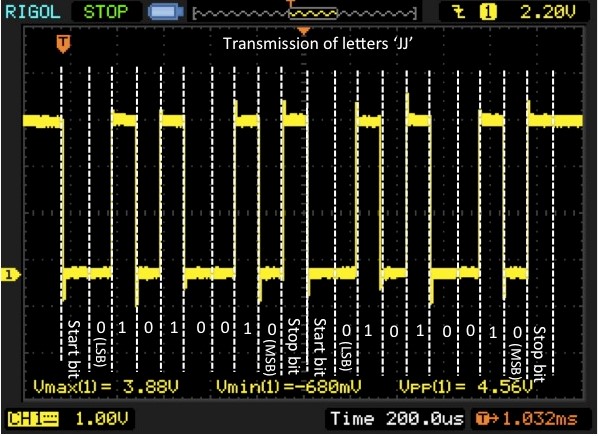
Here is the result of sending two capital letters 'JJ' to the oscilliscope via the Arduino's serial monitor.
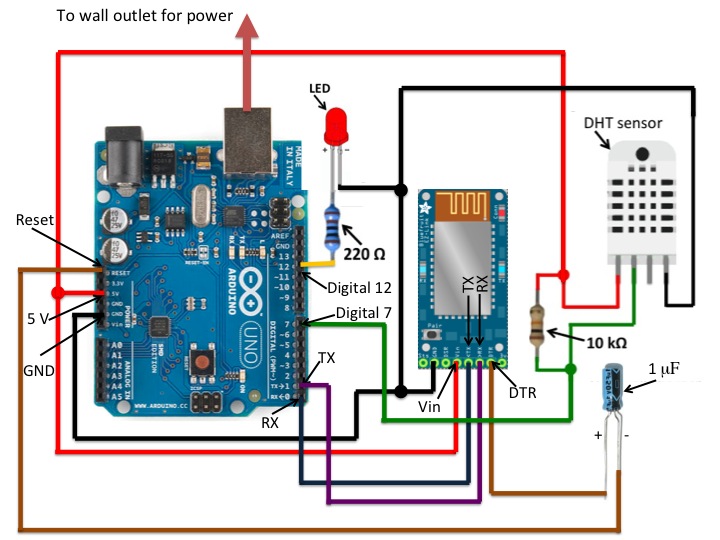
Hardware setup
The hardware setup is shown in the figure below (at the end of this section). Let's now go through understanding this hardware setup piece-by-piece.
Power
The Arduino is connected to a wall outlet via a common A to B Male/Male peripheral USB cable.
We power the Bluetooth module with the Arduino (5V comes from the Arduino board, and the Ground pin).
Serial communication between Bluetooth module and Arduino
For serial communication between Arduino and Bluetooth module,
we connect the Bluetooth module TX pin to the Arudino RX pin, and the Bluetooth module RX pin to the Arduino TX pin.
Wirlessly programming the Arduino
The Bluefruit EZ-link is unique among bluetooth modules in that you can program the Arduino from Bluetooth, instead
of having to use a USB cable from the PC to the Arduino every time you want to upload a sketch.
In other words, you can upload sketches to the Arduino WIRELESSLY over bluetooth.
To make this very handy feature possible, all you need to do is connect a 1uF capacitor between the bluetooth module's DTR pin and the
Arduino's reset pin, as shown the figure below.
LED
We will be wirelessly commanding the Arduino to turn on and off the LED from the PC. In our setup, we connect the
LED's anode (i.e. the "positive side" or long wire side of the LED) to Ardiuno digital pin 12, as shown in the figure below.
The LED's cathode (i.e. the "negative side" or short wire side of the LED) is connected
in series with a 220 Ohm resistor to ground.
Temperature/humidity sensor
For this example, we use a DHT22 sensor. Pin 1 is VCC, pin 2 is Data out, pin 3 is not connected, and pin 4 is ground.
For this sensor, we place a 10K resistor between the sensor's VCC and data pins, to action as a medium
strength pull up on the data line.
Software
Below is the Arduino sketch.
Now wirelessly upload the sketch (via Bluetooth), open the serial monitor, make sure the baud rate is set at 115200,
type "m", and click send.
This is what you should see on the Serial port:
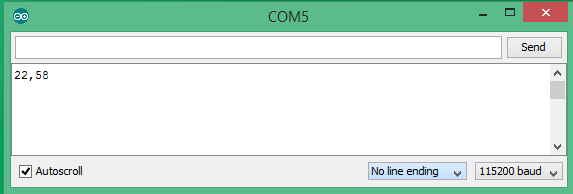
So, when the Arduino receives the character "m", it returns the correct measurements (in this case
the temperature was at 22 degrees Celsius and the humidity was at 58%.)
Now type "h" in the serial monitor and click send. This will turn the LED on.
Now type "l" in the serial monitor and click send. This will turn the LED off.
Application
Manualy sending "m", "h", and "l" commands from a serial monitor is fun and all, but it's not very "user friendly".
The next step is to write an applicaiton running on your computer that will send the order to
turn the LED on and off, as well as periodically send the order to get new measurements from the Arduino board, retrieve the data,
and display on your screen. There are many options for writing this interface... Python, Matlab, Processing, etc...